
How to use a Private key for SSH authentication
Securing your remote server access is paramount in today’s digital landscape. While passwords offer a basic level of security, they are susceptible to brute-force attacks and human error. A more robust and secure method is to use SSH key-based authentication. This method leverages cryptographic key pairs to verify your identity, offering enhanced security and convenience. This article will guide you through the process of setting up SSH authentication using a private key. We will cover the basic steps and then explore alternative methods for achieving the same goal.
What’s a private key?
Even the most complex passwords cannot match the cryptographic strength of private keys. With SSH, private keys significantly improve security by relieving users of the burden of remembering complex passwords (or worse yet, writing them down).
Let’s first Open a terminal and generate a private key.
Step 1 : Check to see if you already have an SSH key.
Before generating a new key pair, it’s wise to check if you already have one. This prevents accidental overwriting of existing keys.
$ ls ~/.sshOutput:

This command lists the files in your .ssh directory, which is the default location for SSH keys. If you see files like id_rsa (the private key) and id_rsa.pub (the public key), you already have an SSH key pair.
Step 2 : Create SSH key.
If you don’t have an SSH key or want to create a new one, use the ssh-keygen command.
$ ssh-keygenOutput:
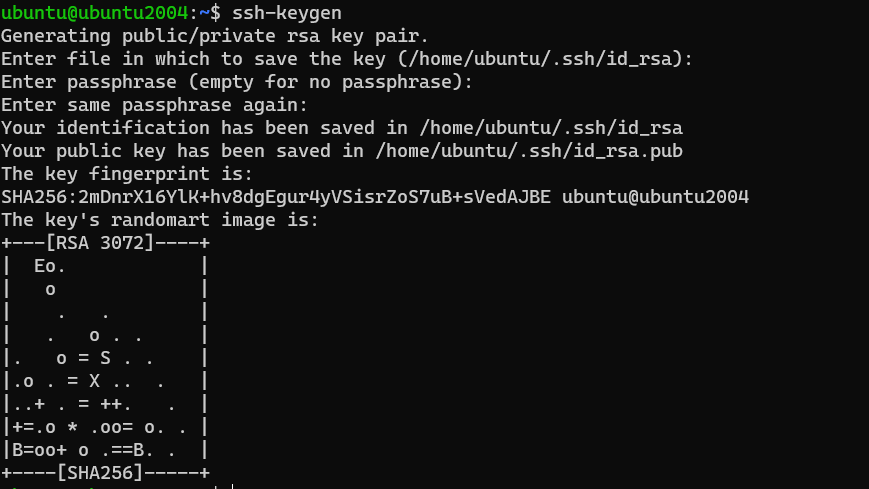
$ Enter file in which to save the key (/home/ubuntu/.ssh/id_rsa):
To use the default filename, press ENTER and proceed.
In the next part, enter a passphrase to secure your key pairs. You can skip this by pressing ENTER.
$ Enter passphrase (empty for no passphrase):
$ Enter same passphrase again:
The ssh-keygen command generates a new SSH key pair. It will prompt you for a file name to save the key. The default location (/home/ubuntu/.ssh/id_rsa) is usually fine. It will also ask for a passphrase. Using a passphrase is highly recommended, as it adds another layer of security. Even if your private key is compromised, an attacker would still need the passphrase to use it.
Step 3 : Copy public key to the remote host.
Now that you have a key pair, you need to copy the public key to the server you want to access. The public key is what the server uses to verify your identity.
$ ls ~/.sshOutput:

To use the SSH key pair you created, we must first copy the public key to the remote server. Fortunately, OpenSSH includes the ssh-copy-id function to do this.
$ ssh-copy-id remote_server_user@remote_server_ip
The ssh-copy-id command simplifies the process of copying your public key. It automatically appends your public key to the ~/.ssh/authorized_keys file on the remote server. You’ll be prompted for the remote user’s password during this process.
Step 4 : SSH using The Private Key.
Now, try connecting to the server using SSH.
$ ssh remote_server_user@remote_server_ip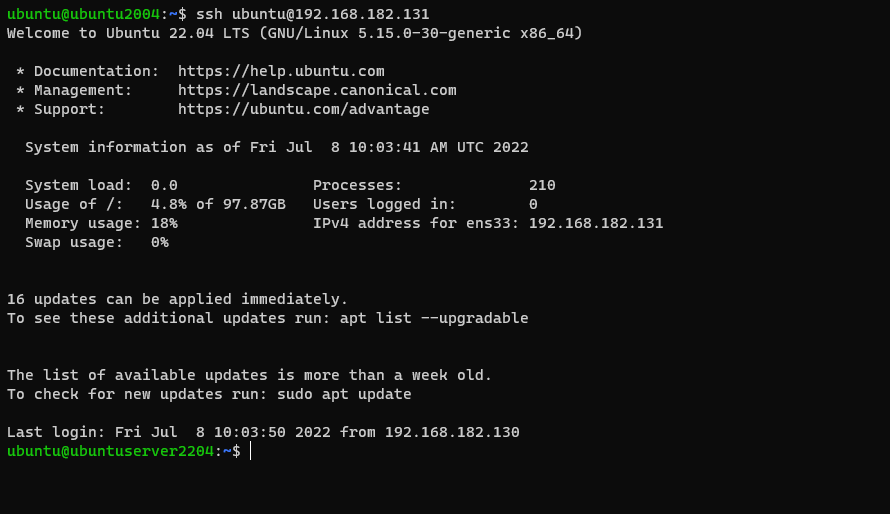
If you set a passphrase for your key, you’ll be prompted to enter it. After that, you should be logged in without needing to enter your password.
You have now successfully utilized SSH key-based authentication. By eliminating password login, you may provide an extra degree of protection.
Alternative Solutions for SSH Authentication using a Private Key
While ssh-copy-id is a convenient tool, it’s not the only way to copy your public key to a remote server. Here are two alternative methods:
1. Manual Public Key Transfer and Configuration
This method involves manually copying the contents of your public key file (~/.ssh/id_rsa.pub) to the ~/.ssh/authorized_keys file on the remote server.
Steps:
-
Copy the Public Key: Use
cat ~/.ssh/id_rsa.pubto display the contents of your public key file. Copy the entire output to your clipboard. -
Connect to the Remote Server: Use standard password-based SSH to connect to the remote server:
ssh remote_server_user@remote_server_ip. -
Create the
.sshDirectory (if it doesn’t exist):mkdir -p ~/.ssh -
Edit the
authorized_keysFile: Use a text editor (likenanoorvim) to open the~/.ssh/authorized_keysfile. If the file doesn’t exist, create it.nano ~/.ssh/authorized_keys -
Paste the Public Key: Paste the public key you copied in step 1 into the
authorized_keysfile. Ensure there are no extra spaces or line breaks. Save the file. -
Set Correct Permissions: It’s crucial to set the correct permissions on the
.sshdirectory and theauthorized_keysfile for security reasons.chmod 700 ~/.ssh chmod 600 ~/.ssh/authorized_keys
Explanation:
This method gives you more control over the process. It’s particularly useful if you don’t have ssh-copy-id available or if you need to append the key to an existing authorized_keys file with specific formatting requirements. The chmod commands ensure that only the user can read and write to these sensitive files, preventing unauthorized access. How to use a Private key for SSH authentication ensures security.
2. Using ssh with Input Redirection
This is a one-line solution that uses ssh to execute a command on the remote server, appending your public key to the authorized_keys file.
Command:
cat ~/.ssh/id_rsa.pub | ssh remote_server_user@remote_server_ip "mkdir -p ~/.ssh && chmod 700 ~/.ssh && cat >> ~/.ssh/authorized_keys && chmod 600 ~/.ssh/authorized_keys"Explanation:
cat ~/.ssh/id_rsa.pub: This outputs the content of your public key.|: This pipes the output to thesshcommand.ssh remote_server_user@remote_server_ip "...": This executes the command enclosed in quotes on the remote server.mkdir -p ~/.ssh && chmod 700 ~/.ssh: This creates the.sshdirectory if it doesn’t exist and sets the correct permissions. The-pflag prevents errors if the directory already exists.cat >> ~/.ssh/authorized_keys: This appends the piped public key to theauthorized_keysfile.chmod 600 ~/.ssh/authorized_keys: This sets the correct permissions on theauthorized_keysfile.
Advantages:
This method is concise and doesn’t require you to manually connect to the remote server first. It’s a quick and efficient way to add your public key.
Important Considerations:
- Password Prompt: You’ll still be prompted for the remote user’s password the first time you run this command.
- Security: Be cautious when piping commands over SSH. Ensure you understand the command being executed on the remote server. This is especially true in automated scripts. How to use a Private key for SSH authentication is important.
Conclusion
This tutorial has demonstrated how to create SSH key pairs and copy the keys to remote hosts using the ssh-copy-id command and provided two alternative methods. The steps mentioned above allow you to authenticate SSH sessions without using a password, significantly enhancing security. Furthermore, you may control numerous servers at the same time with a single key pair. By implementing these strategies, you can strengthen your server security and streamline your remote access workflow. Understanding how to use a Private key for SSH authentication is a cornerstone of secure system administration.