
Comprehensive Guide to Setting Up SSL Certificate on cPanel
In today’s digital landscape, securing your website with an SSL (Secure Sockets Layer) certificate is crucial for ensuring the privacy and integrity of data transmitted between your website and its visitors. An SSL certificate encrypts the data exchanged, protecting sensitive information such as login credentials, payment details, and personal information from potential cyber threats. Without an SSL certificate, your website is vulnerable to man-in-the-middle attacks, data breaches, and other security risks, which can severely damage your credibility and trustworthiness.
One of the most popular web hosting control panels, cPanel, provides a user-friendly interface for managing various aspects of your website, including SSL certificate installation and configuration. In this comprehensive guide, we’ll walk you through the step-by-step process of setting up an SSL Certificate on cPanel, ensuring that your website is secure and compliant with industry standards.
Understanding SSL Certificates
Before we dive into the installation process, let’s briefly explore the concept of SSL certificates and their significance.
An SSL certificate is a digital file that establishes an encrypted connection between a web server and a client (typically a web browser). It serves two primary purposes:
- Encryption: It encrypts data transmitted between the server and the client, preventing eavesdropping and data tampering.
- Authentication: It verifies the identity of the website owner, ensuring that visitors are connecting to the legitimate website and not a fraudulent imposter.
SSL certificates are issued by trusted third-party entities called Certificate Authorities (CAs). These CAs follow strict validation processes to ensure the legitimacy of the website owner before issuing the certificate.
There are different types of SSL certificates available, ranging from Domain Validated (DV) certificates, which provide basic encryption, to Extended Validation (EV) certificates, which offer the highest level of trust and security. The choice of certificate depends on your specific requirements and budget.
Step 1: Generating a CSR and Private Key
Before you can obtain an SSL certificate, you need to generate a Certificate Signing Request (CSR) and a private key. The CSR is a encrypted text file that contains information about your website, such as your domain name, company name, and location. The private key is a crucial component that allows you to establish a secure connection between your web server and visitors’ browsers.
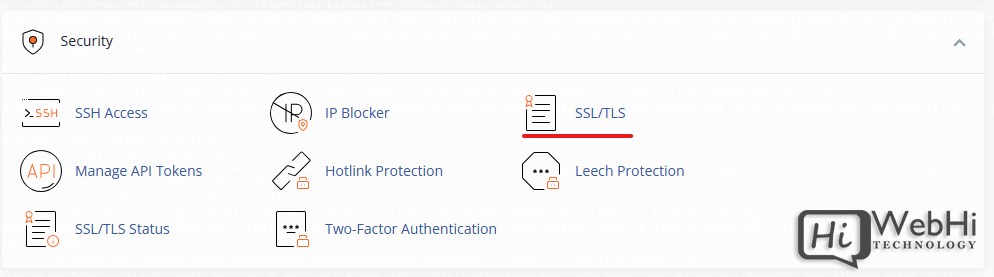
To generate a CSR and private key in cPanel, follow these steps:
- Log in to your cPanel account.
-
Navigate to the "SSL/TLS" section. This can usually be found by searching for "SSL" in the cPanel search bar.

-
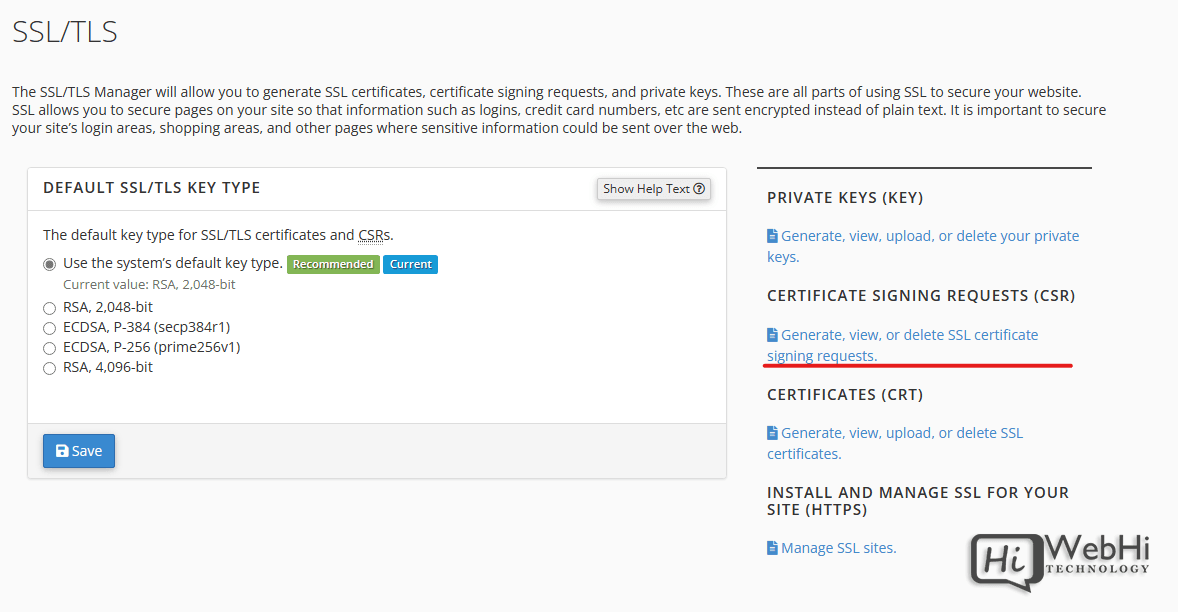
Click on "Generate, view, upload, or delete SSL certificate signing requests."

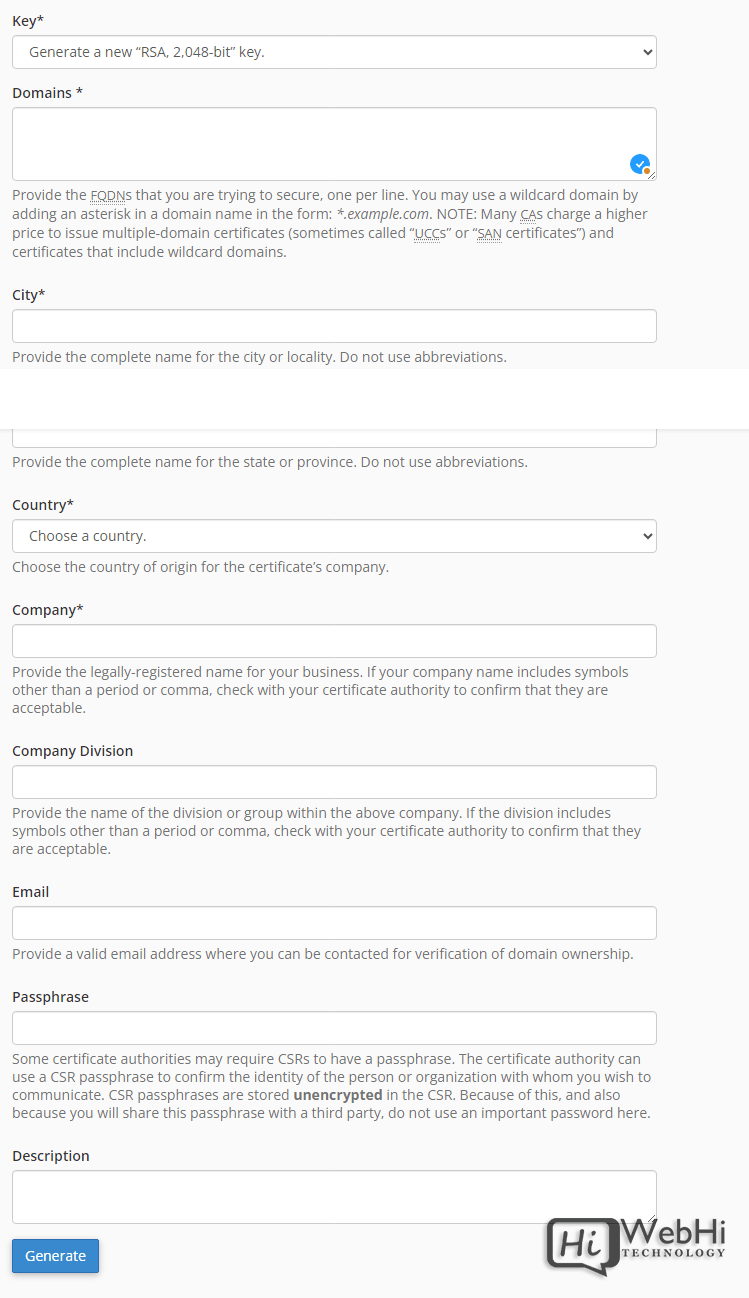
- Fill out the required information. This includes your domain name, city, state, country, company name (if applicable), and email address. Ensure that you enter the correct domain name for which you intend to use the SSL certificate.
- Choose a key size. The recommended key size is 2048 bits or higher.
-
Click "Generate."

After completing this step, cPanel will generate a CSR and a private key for your website. Make sure to keep the private key safe and secure, as it will be required during the SSL Certificate on cPanel installation process.
Step 2: Obtaining an SSL Certificate
Once you have generated a CSR, the next step is to obtain an SSL certificate from a trusted Certificate Authority (CA). There are several CAs to choose from, such as Comodo, DigiCert, GeoTrust, Thawte, and RapidSSL, among others. Let’s Encrypt is also a good free option.
The process of obtaining an SSL certificate varies slightly depending on the CA you choose, but generally involves the following steps:
- Choose an SSL certificate type. Select the certificate type that best suits your needs and budget.
- Purchase the SSL certificate. Follow the CA’s instructions to purchase the certificate.
- Submit the CSR. Paste the CSR code generated in cPanel into the CA’s designated field.
- Verify domain ownership. The CA will verify that you own the domain for which you are requesting the certificate. This usually involves verifying an email address associated with the domain or adding a specific DNS record.
- Receive the SSL certificate. Once the CA has verified your domain ownership, they will issue the SSL certificate to you.
Some CAs provide the option to generate a CSR directly on their website, but it is generally recommended to generate the CSR within cPanel, as it ensures that the private key remains securely stored on your server.
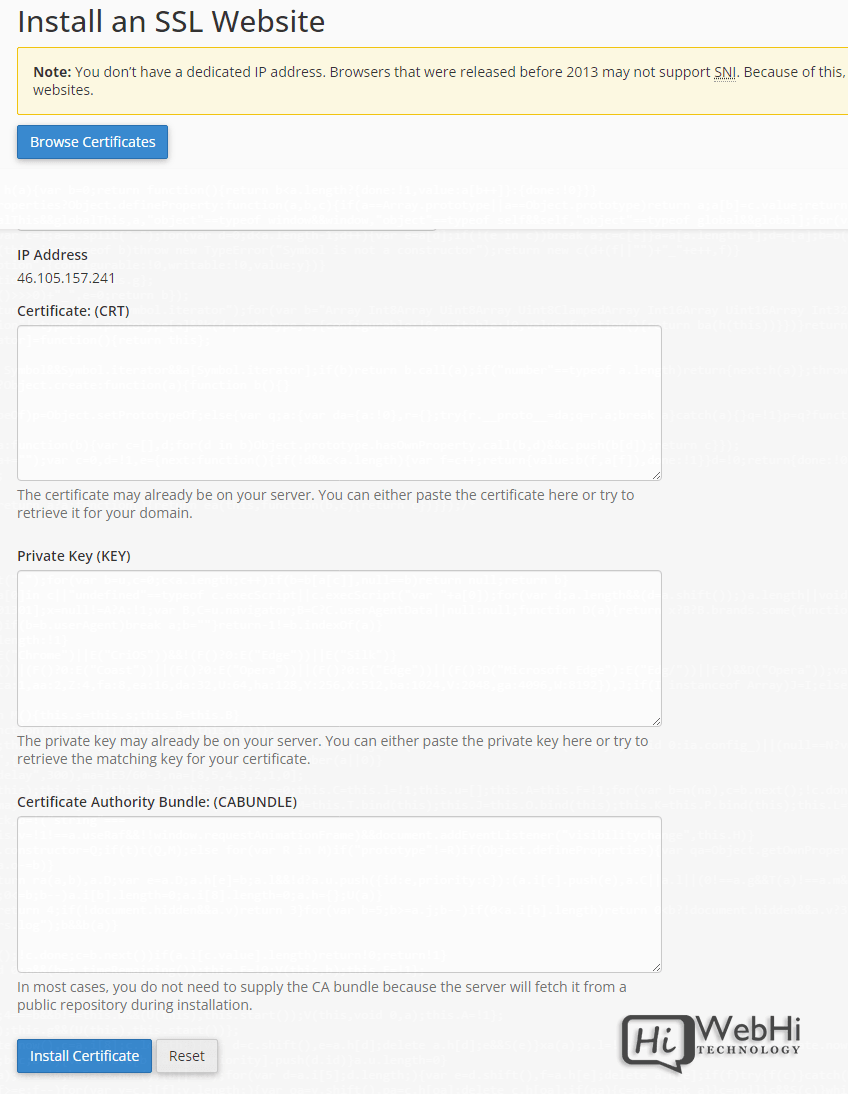
Step 3: Installing the SSL Certificate on cPanel
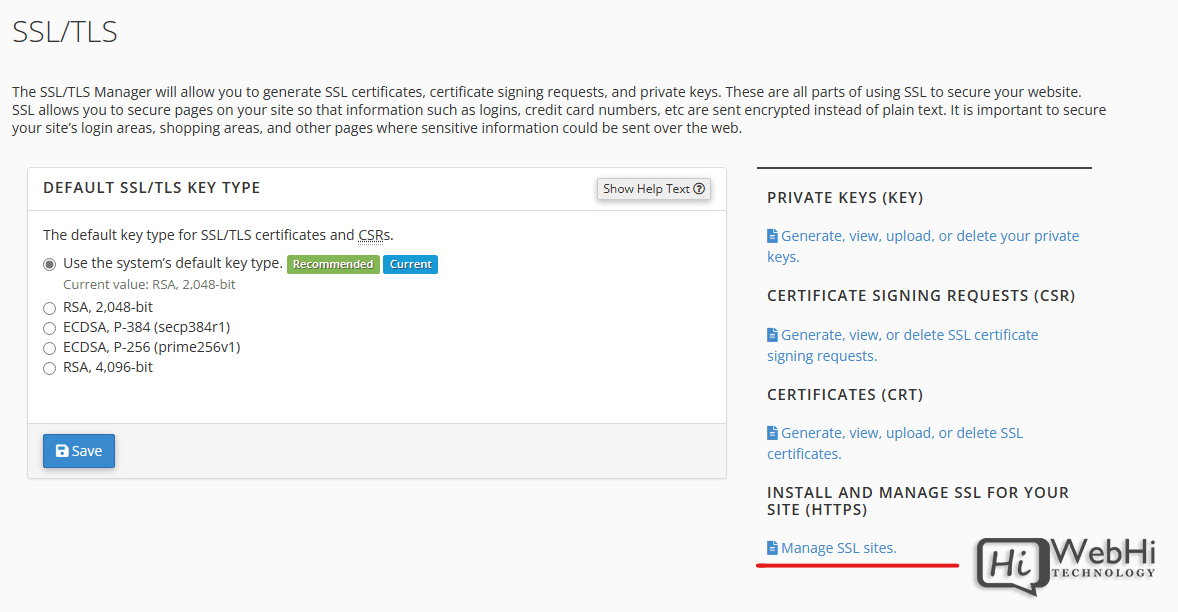
After obtaining the SSL certificate from the CA, it’s time to install it on your cPanel account. Follow these steps:
- Log in to your cPanel account.
-
Navigate to the "SSL/TLS" section.
-
Click on "Manage SSL Sites."
- Select the domain for which you want to install the SSL certificate.
- Paste the SSL certificate code into the "Certificate (CRT)" field.
- The private key should be automatically populated. If not, paste the private key you generated earlier into the "Private Key (KEY)" field.
- If your CA provided a "Certificate Authority Bundle (CABundle)," paste it into the corresponding field.
-
Click "Install Certificate."


If the installation is successful, you should see a confirmation message in cPanel. It’s important to note that the SSL Certificate on cPanel installation process may vary slightly depending on the specific CA and the type of SSL certificate you’ve purchased.
Step 4: Configuring Your Website for HTTPS
After installing the SSL certificate, you need to configure your website to use the secure HTTPS protocol instead of the insecure HTTP protocol. This step is crucial to ensure that your website visitors benefit from the security provided by the SSL certificate.
In cPanel, you can easily configure your website for HTTPS by following these steps:
- Log in to your cPanel account.
- Navigate to the "Domains" section.
- Click on "Domains."
- Find the domain you’re working with and enable "Force HTTPS Redirect."
After completing these steps, your website should now be accessible via the HTTPS protocol (e.g., https://www.yourdomain.com). However, it’s important to note that you may need to update any hard-coded URLs or links within your website’s content to use the HTTPS protocol as well.
Step 5: Enforcing HTTPS and Setting Up Redirects
While configuring your website for HTTPS is a significant step, it’s also essential to enforce the use of HTTPS and set up appropriate redirects to ensure a seamless and secure user experience.
- Implement an .htaccess redirect. You can use an .htaccess file to automatically redirect all HTTP requests to the HTTPS version of your website. Add the following code to your .htaccess file:
RewriteEngine On
RewriteCond %{HTTPS} off
RewriteRule ^(.*)$ https://%{HTTP_HOST}%{REQUEST_URI} [L,R=301]
This code will automatically redirect all HTTP requests to the secure HTTPS version of your website.
-
Update internal links. Ensure that all internal links within your website content, such as links to images, CSS files, and JavaScript files, use the HTTPS protocol.
For example, if you’re using WordPress, you can install a plugin like “Really Simple SSL” or “SSL Insecure Content Fixer” to automatically fix mixed content issues and enforce HTTPS across your entire website.
Step 6: Testing and Monitoring Your SSL Implementation
After completing the installation and configuration steps, it’s crucial to thoroughly test your SSL implementation to ensure that it’s working correctly and providing the intended security benefits.
- Visit your website using HTTPS. Type
https://yourdomain.cominto your browser and verify that the website loads without any errors or warnings. - Check the SSL certificate details. Click on the padlock icon in the browser’s address bar to view the SSL certificate details. Verify that the certificate is valid, issued to the correct domain name, and issued by a trusted CA.
- Use an online SSL checker. There are several online tools available that can analyze your website’s SSL configuration and identify any potential issues or vulnerabilities.
- Monitor your SSL certificate expiration date. SSL certificates have a limited validity period, typically one to two years. Set a reminder to renew your certificate before it expires to avoid any interruptions in your website’s security.
Conclusion
Securing your website with an SSL Certificate on cPanel is an essential step in protecting your visitors’ sensitive information and building trust with your audience. By following this comprehensive guide, you can easily set up an SSL certificate on cPanel and enjoy the numerous benefits of a secure website, including improved search engine rankings, increased customer confidence, and compliance with industry standards.
Remember, the process of installing and configuring an SSL certificate involves multiple steps, and it’s crucial to follow best practices to ensure that your implementation is robust and effective. Regularly monitor your SSL configuration, stay informed about the latest security updates, and consider upgrading to a more secure certificate type as your website grows and evolves.
With a secure website powered by an SSL certificate, you can provide a safe and trustworthy online experience for your visitors, ultimately contributing to the overall success and credibility of your online presence.
Alternative Solutions for Setting Up SSL Certificate
While the cPanel method is widely used, here are two alternative approaches to obtaining and managing SSL certificates:
1. Using Let’s Encrypt with Certbot on a VPS or Dedicated Server
This method involves using a free, automated, and open Certificate Authority (CA) called Let’s Encrypt and a software tool called Certbot. This is more suited for users who have root access to their server, typically on a VPS or Dedicated Server, and are comfortable with the command line.
Explanation:
Let’s Encrypt offers free SSL certificates. Certbot automates the process of obtaining and installing these certificates, as well as configuring your web server (e.g., Apache or Nginx) to use them. This eliminates the manual steps of CSR generation, certificate signing, and web server configuration.
Steps:
- Install Certbot: The installation process varies depending on your operating system. You can find detailed instructions on the Certbot website (https://certbot.eff.org/).
-
Run Certbot: Once installed, run Certbot with the appropriate command for your web server. For example, for Apache on Debian/Ubuntu:
sudo certbot --apache -d yourdomain.com -d www.yourdomain.comReplace
yourdomain.comwith your actual domain name. This command will automatically obtain a certificate, install it in your Apache configuration, and configure redirects from HTTP to HTTPS. - Automatic Renewal: Certbot can also be configured to automatically renew your certificates before they expire. This is typically done by setting up a cron job or systemd timer.
Code Example (Cron Job for Auto-Renewal):
Add the following line to your crontab file (using crontab -e):
0 0 * * * /usr/bin/certbot renew --quiet --no-self-upgradeThis will run Certbot’s renewal command every day at midnight.
Advantages:
- Free SSL certificates.
- Automated certificate management.
- Suitable for users with server access and command-line proficiency.
Disadvantages:
- Requires root access to the server.
- Involves command-line operations.
- Not directly integrated with cPanel.
2. Using a Cloudflare SSL Certificate
Cloudflare offers a free plan that includes a free SSL certificate. This approach involves using Cloudflare as a reverse proxy for your website.
Explanation:
Cloudflare acts as an intermediary between your website visitors and your web server. When a visitor accesses your website, their request is first routed to Cloudflare’s servers, which then forward the request to your web server. Cloudflare provides various security and performance benefits, including SSL encryption, DDoS protection, and content caching.
Steps:
- Create a Cloudflare Account: Sign up for a free Cloudflare account at https://www.cloudflare.com/.
- Add your Website: Add your website to your Cloudflare account and follow the instructions to update your domain’s nameservers to point to Cloudflare.
- Configure SSL/TLS Settings: In the Cloudflare dashboard, navigate to the "SSL/TLS" section and choose an SSL/TLS encryption mode. The "Flexible" option is the simplest, where Cloudflare encrypts the connection between the visitor and Cloudflare, but not between Cloudflare and your server. The "Full" option requires an SSL certificate on your server (even a self-signed one) to encrypt the connection between Cloudflare and your server. "Strict" enforces a valid SSL certificate on your server.
- Enable HTTPS Rewrites: In the Cloudflare dashboard, enable "Always Use HTTPS" to automatically redirect all HTTP requests to HTTPS.
Code Example (Not Directly Applicable – Cloudflare Configuration):
There is no direct code to insert. Cloudflare manages the SSL configuration through its dashboard.
Advantages:
- Free SSL certificate.
- Easy to set up.
- Provides additional security and performance benefits.
- No need to manage SSL certificates on your server (with "Flexible" SSL).
Disadvantages:
- Requires using Cloudflare as a reverse proxy.
- "Flexible" SSL might not be the most secure option as traffic between Cloudflare and your server isn’t encrypted.
- You’re relying on a third-party service (Cloudflare).
These alternative solutions offer different ways to secure your website with SSL certificates, depending on your technical expertise, server access, and desired level of control. Remember to evaluate the pros and cons of each approach before choosing the one that best fits your needs.