How to Install Exchange Server Step by Step Unattended Mode
This article will guide you through the process of installing Exchange Server on a Windows Server. Before proceeding with the installation, ensure that you have completed the necessary prerequisites and prepared your Active Directory and domains. Once these tasks are completed, you are ready to begin installing Exchange Server.
Before Installing Exchange Server
Before starting the installation of Exchange Server, you must follow two articles:
Installing Exchange Server prerequisites
Once you complete the above configuration, you can proceed with installing the Exchange Mailbox Server Role.
It’s important to note that once you install Exchange on a server, you cannot change the server name. Renaming a server after installing an Exchange server role is not supported.
Download Exchange Server
Go to the Exchange Server build numbers and release dates page. The page lists all Exchange Server build numbers and release dates. Download and save the Exchange Server ISO image.
Note: We recommend downloading the latest Exchange Server build version.
In File Explorer, right-click on the Exchange Server CU ISO image file and select Mount. It will mount the ISO to a drive. For example, the F: drive. The F: drive contains the Exchange installation files.
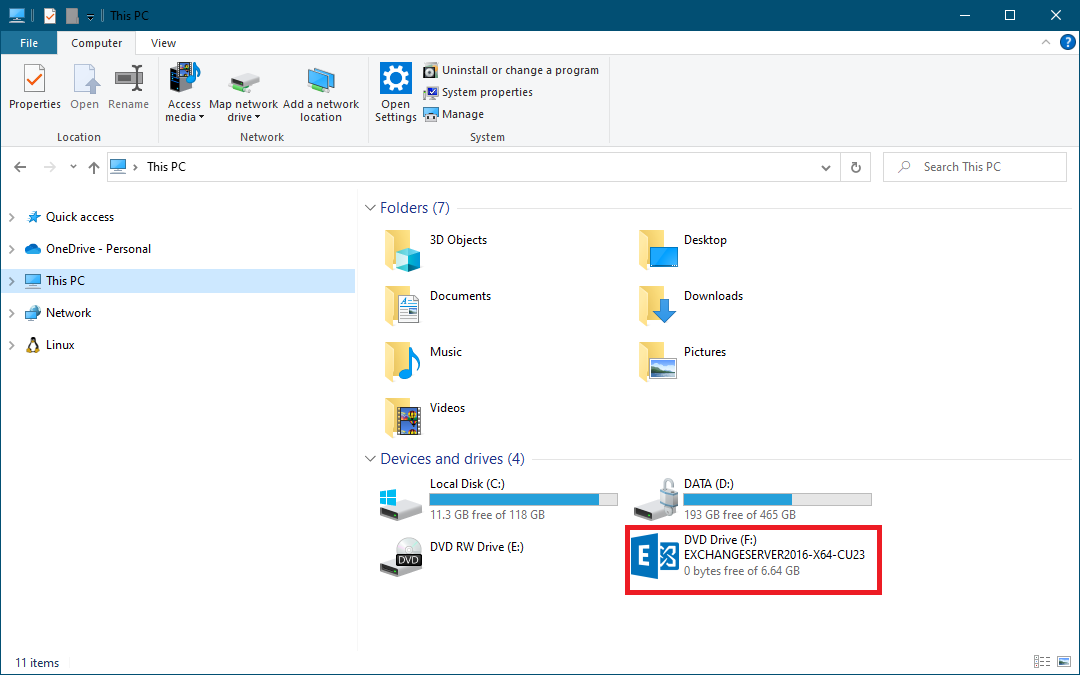
Mount the Exchange ISO image before proceeding to the next step.
Install Exchange Server with command line
There are two options for installing Exchange server. You can choose to:
If you want to install Exchange Server with a graphical user interface (GUI), you can use the Exchange setup wizard. On the other hand, if you prefer a command line interface, you can use the Exchange unattended mode.
It’s important to note that if there is a pending reboot available on the system, the Exchange Server installation will fail. To avoid this, we recommend restarting the Windows Server before starting the installation.
To begin the installation process, open Command Prompt as an administrator. Install the Mailbox Server Role and the management tools in the default folder on the local server.
C:>F:Setup.exe /IAcceptExchangeServerLicenseTerms_DiagnosticDataOFF /mode:Install /r:MB
Microsoft Exchange Server 2016 Cumulative Update 23 Unattended Setup
Copying Files...
File copy complete. Setup will now collect additional information needed for installation.
Languages
Management tools
Mailbox role: Transport service
Mailbox role: Client Access service
Mailbox role: Mailbox service
Mailbox role: Front End Transport service
Mailbox role: Client Access Front End service
Performing Microsoft Exchange Server Prerequisite Check
    Configuring Prerequisites                                      COMPLETED
    Prerequisite Analysis                                          COMPLETED
Configuring Microsoft Exchange Server
    Preparing Setup                                                COMPLETED
    Stopping Services                                              COMPLETED
    Copying Exchange Files                                         COMPLETED
    Language Files                                                 COMPLETED
    Restoring Services                                             COMPLETED
    Language Configuration                                         COMPLETED
    Exchange Management Tools                                      COMPLETED
    Mailbox role: Transport service                                COMPLETED
    Mailbox role: Client Access service                            COMPLETED
    Mailbox role: Mailbox service                                  COMPLETED
    Mailbox role: Front End Transport service                      COMPLETED
    Mailbox role: Client Access Front End service                  COMPLETED
    Finalizing Setup                                               COMPLETED
The Exchange Server setup operation completed successfully.
Setup has made changes to operating system settings that require a reboot
to take effect. Please reboot this server prior to placing it into production.
The installation of the Exchange Server Mailbox Role is now complete. It is recommended to reboot the server.
Sign in to Exchange Admin Center (EAC)
To access the Exchange Admin Center (EAC), open your preferred web browser and navigate to https://hostname/ecp, replacing “hostname” with your server’s hostname. Alternatively, you can use https://localhost/ecp.
Your browser will display a certificate warning. Proceed with caution and accept the risk to continue. For example, if your Exchange Server hostname is EX01-2023, enter your domain and administrator credentials, then click “sign in.”
You will be taken to the mailbox area, which should be mostly empty, except for the one mailbox associated with the account used to install Exchange Server.
Conclusion
You acquired the knowledge to execute a step-by-step installation of Exchange Server on Windows Server. Utilizing the command line proves to be a superb method for installing the Mailbox Server Role. Following a system restart, ensure that you are able to access the Exchange Admin Center.
Alternative Installation Methods for Exchange Server
While the article effectively outlines the command-line installation of Exchange Server, let’s explore alternative methods to achieve the same result, focusing on different approaches to unattended installations.
1. Using a Configuration File (Answer File)
Instead of directly passing parameters through the command line, you can use a configuration file, also known as an answer file, to store the installation parameters. This method offers better organization and reusability, especially when deploying Exchange Server across multiple environments.
Explanation:
The core idea is to create a text file (e.g., ExchangeConfig.txt) that contains all the necessary parameters for the Exchange Server setup. The setup program can then read this file and automatically configure the installation process. This method simplifies the command line and makes it easier to manage complex installation scenarios.
Steps:
- Create a Configuration File: Create a text file (e.g.,
ExchangeConfig.txt) with the required parameters. The structure of the file needs to be in a format that theSetup.exeutility can understand. While there’s no explicitly defined format for a simple text file, you can leverage PowerShell to generate the necessary commands from a structured format. - Use PowerShell to generate the command: We will create a PowerShell script to read the variables and then generate the setup command:
# Define the installation parameters
$Parameters = @{
    Mode = "Install"
    Role = "Mailbox"
    IAcceptExchangeServerLicenseTerms_DiagnosticDataOFF = $true
    InstallPath = "C:Exchange"  #Optional installation path
    OrganizationName = "MyOrganization"
}

# Build the command string
$Command = "F:Setup.exe "  # Assuming F: is the mounted ISO drive
foreach ($Key in $Parameters.Keys) {
    $Command += "/$Key:`"$($Parameters[$Key])`" "
}

# Output the command to the console (for verification)
Write-Host "Generated Command: $Command"

# Execute the command
Invoke-Expression $Command
Explanation of the PowerShell Script:
$ParametersHash Table: This hash table stores all the installation parameters you want to configure. Key-value pairs represent the parameter name and its corresponding value.$CommandString: This string is built dynamically. It starts with the path toSetup.exe(assuming it’s on theF:drive).- Looping Through Parameters: The
foreachloop iterates through each key in the$Parametershash table. - Building the Command: Inside the loop, each parameter is appended to the
$Commandstring in the format/ParameterName:"Value". Write-Host: This line displays the generated command in the console. This is extremely useful for verifying that the command is constructed correctly before execution.Invoke-Expression: This cmdlet executes the dynamically constructed command. It’s similar to running the command directly in the command prompt.
Important Considerations:
- Error Handling: The above example lacks error handling. In a production environment, you should add
try-catchblocks to handle potential errors during the command execution. - Security: Be mindful of storing sensitive information (like passwords) in the configuration file. Consider using encrypted files or secure storage mechanisms for such data.
- Parameter Validation: Implement validation checks in your script to ensure the parameters are valid before constructing the command. This helps prevent errors during the Exchange Server installation.
- Logging: Add logging to your script to track the progress and any errors that occur. This makes troubleshooting much easier.
Benefits:
- Clean Command Line: The primary command is now simple:
.Install-Exchange.ps1. - Centralized Configuration: All installation parameters are stored in a single, easy-to-manage PowerShell script.
- Reusability: You can easily modify the PowerShell script to customize the installation for different environments.
- Version Control: The PowerShell script can be placed under version control (e.g., Git) for tracking changes.
2. Using Desired State Configuration (DSC)
Desired State Configuration (DSC) is a PowerShell feature that allows you to define the desired state of your system. You can use DSC to automate the installation and configuration of Exchange Server, ensuring consistency across your environment.
Explanation:
DSC enables you to declare the desired state of your server. PowerShell then works to bring the server into that state. This is especially useful in larger environments where you need to ensure consistency across many servers.
Steps (Conceptual):
- Create a DSC Configuration: Define a DSC configuration file that specifies the desired state of the Exchange Server. This file would include resources for installing the necessary Windows features, installing the Exchange Server prerequisites, and finally, installing Exchange Server itself.
- Apply the DSC Configuration: Use the
Start-DscConfigurationcmdlet to apply the DSC configuration to the target server.
Challenges:
- Complexity: Creating DSC configurations for complex applications like Exchange Server can be quite involved. You’ll need to understand the various DSC resources and how to configure them correctly.
- Lack of Native Exchange DSC Resources: Microsoft doesn’t provide native DSC resources specifically for Exchange Server. You might need to rely on community-developed resources or create your own custom resources. This increases the learning curve and maintenance effort.
- Idempotency: DSC relies on the concept of idempotency (running the configuration multiple times should result in the same state). Ensuring that your configuration is truly idempotent for an application as complex as Exchange can be tricky.
Illustrative (Simplified) DSC Example (Conceptual – Requires Custom Resources):
Configuration ExchangeInstall
{
    Import-DscResource -ModuleName PSDesiredStateConfiguration

    Node localhost
    {
        # Install Windows Features (Example)
        WindowsFeature WebServer
        {
            Ensure = "Present"
            Name   = "Web-Server"
        }

        # Install Exchange Prerequisites (Conceptual - Requires custom resource)
        ExchangePrerequisites ExchangePrereq
        {
            Ensure = "Present"
        }

        # Install Exchange Server (Conceptual - Requires custom resource)
        ExchangeServer Installation
        {
            Ensure = "Present"
            SourcePath = "F:"  # Assuming F: is the mounted ISO drive
            AcceptLicenseTerms = $true
            Role = "Mailbox"
            # ... Other parameters
        }
    }
}

# Compile the configuration
ExchangeInstall -OutputPath "C:DSC"

# Apply the configuration
Start-DscConfiguration -Path "C:DSC" -Wait -Verbose
Explanation of Conceptual DSC Example:
Configuration ExchangeInstall: Defines the DSC configuration named "ExchangeInstall."Import-DscResource: Imports the necessary DSC resources.PSDesiredStateConfigurationis a built-in module. TheExchangePrerequisitesandExchangeServerresources would be custom resources you would need to create or obtain from a community source.Node localhost: Specifies that the configuration applies to the local machine.WindowsFeature WebServer: An example of using a built-in DSC resource to ensure the "Web-Server" Windows feature is installed.ExchangePrerequisitesandExchangeServer: These are placeholders for custom DSC resources that would handle the installation of Exchange prerequisites and Exchange Server itself. These resources would need to be written using PowerShell scripting and would encapsulate the logic for installing the software. They would likely use the same underlyingSetup.execommand-line interface as the original article.ExchangeInstall -OutputPath "C:DSC": Compiles the configuration into a MOF file (Managed Object Format) stored in the "C:DSC" directory.Start-DscConfiguration -Path "C:DSC" -Wait -Verbose: Applies the compiled configuration to the target server. The-Waitparameter tells the cmdlet to wait for the configuration to complete, and-Verboseprovides detailed output.
Benefits of DSC (in the right circumstances):
- Idempotency: DSC ensures that the system remains in the desired state, even if the configuration is applied multiple times.
- Centralized Management: DSC configurations can be managed and deployed from a central location, simplifying the management of multiple servers.
- Consistency: DSC ensures that all servers are configured in the same way, reducing the risk of configuration drift.
Drawbacks of DSC for Exchange Server:
- Complexity: DSC can be complex to set up and maintain, especially for large and complex applications like Exchange Server.
- Lack of Native Resources: The lack of native DSC resources for Exchange Server can make it difficult to automate the installation and configuration process.
- Steep Learning Curve: DSC has a steep learning curve, and it can take time to become proficient in using it.
Conclusion:
While the original article provides a solid method for unattended Exchange Server installation, these alternatives – using configuration files and DSC – offer different approaches with varying levels of complexity and benefits. The choice of method depends on the specific requirements of your environment, your familiarity with the tools, and the level of automation you desire. The key is to carefully consider the pros and cons of each approach before making a decision.