Installing Jitsi Meet on Ubuntu 18.04/20.04/22.04 LTS
Jitsi Meet is a powerful, open-source video conferencing solution, perfect for facilitating virtual meeting rooms for remote teams. It boasts high-quality video and audio and prioritizes security with fully encrypted connections using TLS/SSL certificates, often leveraging the ease and accessibility of Let’s Encrypt. This guide will walk you through the steps to install Jitsi Meet on Ubuntu 18.04, 20.04, and 22.04 LTS.
Step 1: Updating Server
Before diving into the Jitsi Meet installation, it’s crucial to ensure your Ubuntu server is up-to-date. This helps prevent compatibility issues and ensures you have the latest security patches. Execute the following commands to update your system’s software:
$ sudo apt update && sudo apt upgrade -yThis command first updates the package lists and then upgrades all installed packages to their newest versions. The -y flag automatically answers "yes" to any prompts, streamlining the process.
Step 2: Installing Nginx
Nginx is an excellent choice for a reverse proxy server, handling incoming requests and forwarding them to the Jitsi Meet web interface. The Jitsi installation program will automatically configure Nginx if it’s already installed. If not, use the following commands to install and activate Nginx:
$ sudo apt install -y nginx
$ systemctl start nginx.service
$ systemctl enable nginx.service
These commands install the Nginx web server, start the Nginx service, and enable it to start automatically on boot.
Next, ensure your system supports apt repositories served via HTTPS. This is generally enabled by default, but it’s a good practice to confirm:
$ sudo apt install apt-transport-httpsJitsi Meet also requires dependencies from Ubuntu’s universe package repository. To ensure this repository is enabled, run:
$ sudo apt-add-repository universeThis command adds the universe repository to your system’s software sources.
Now, add the Jitsi repository to your system. This allows you to install and update Jitsi Meet directly using apt.
$ curl https://download.jitsi.org/jitsi-key.gpg.key | sudo sh -c 'gpg --dearmor > /usr/share/keyrings/jitsi-keyring.gpg'
$ echo 'deb [signed-by=/usr/share/keyrings/jitsi-keyring.gpg] https://download.jitsi.org stable/' | sudo tee /etc/apt/sources.list.d/jitsi-stable.list > /dev/null
The first command downloads the Jitsi repository key and adds it to your system’s keyring. The second command adds the Jitsi repository to your system’s list of software sources.
Update package versions across all repositories:
$ sudo apt updateFinally, launch the Jitsi Meet installation:
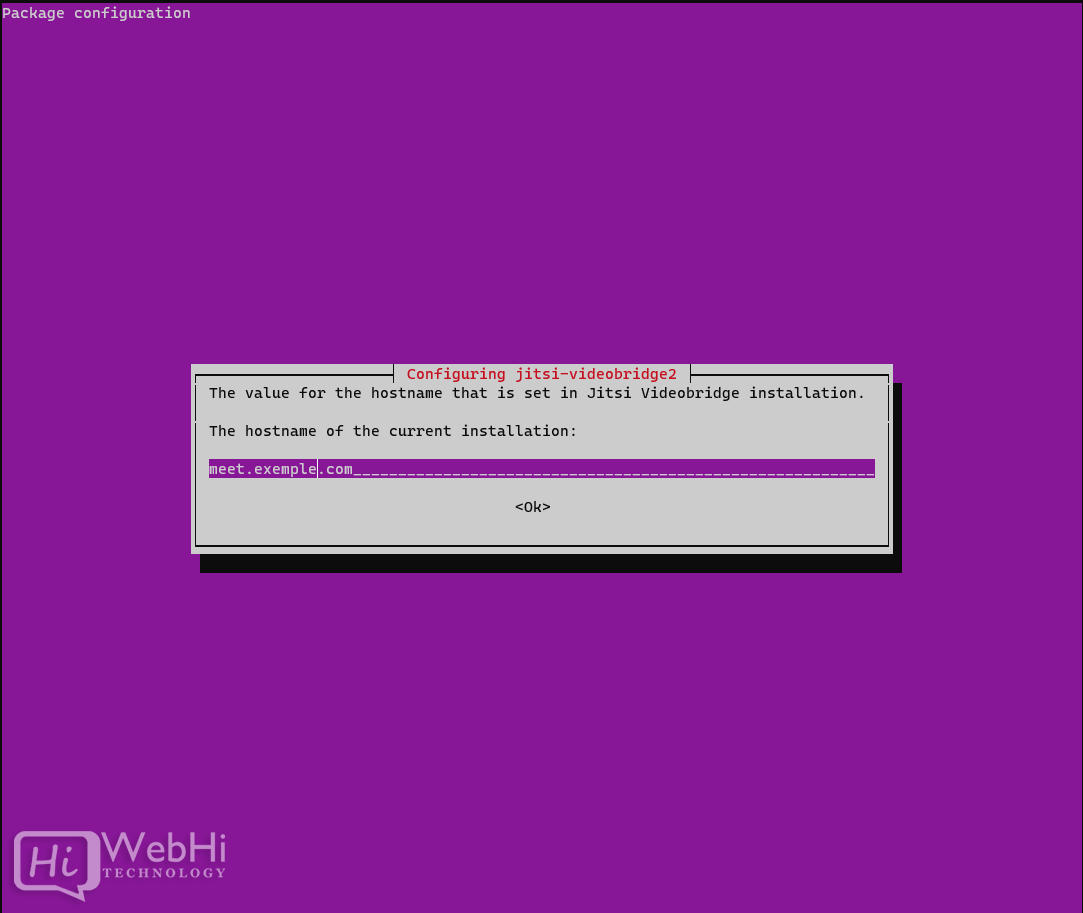
$ apt install -y jitsi-meetDuring the installation, you’ll be prompted to configure the hostname for your Jitsi Meet instance. For example, you might use meet.example.com.
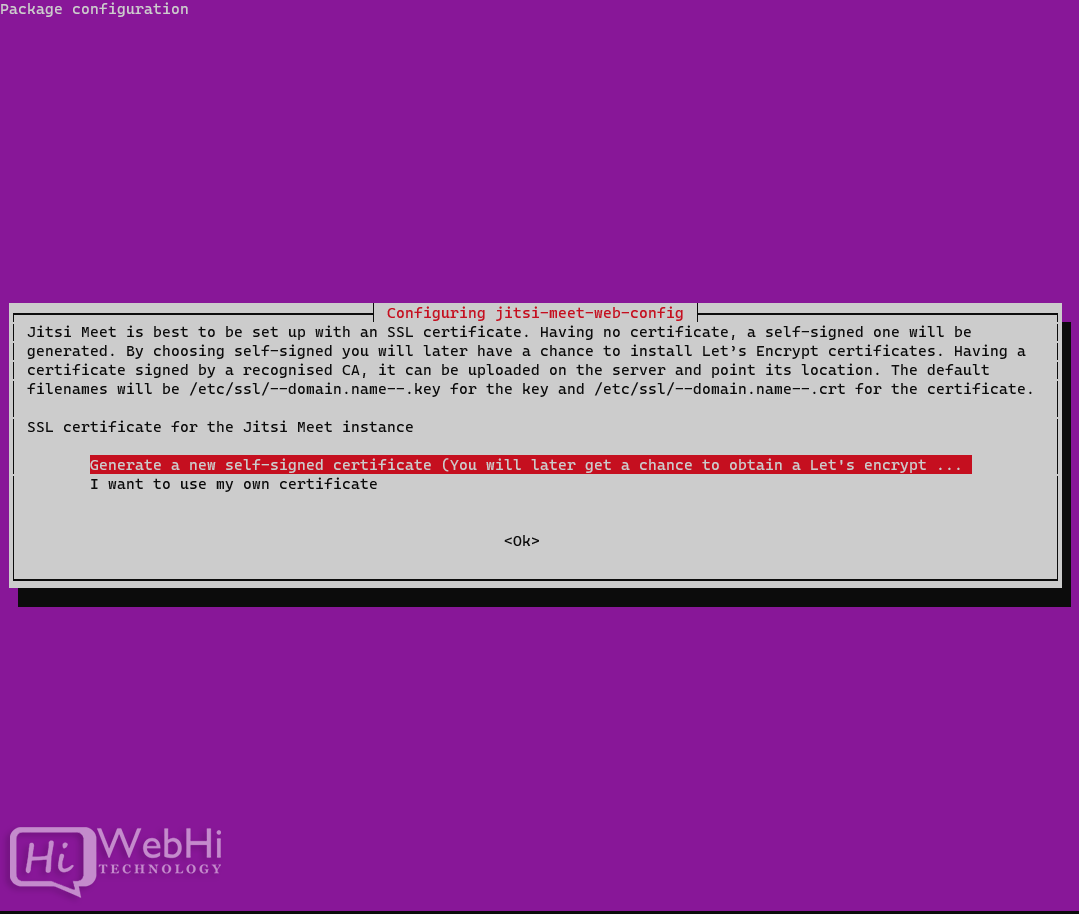
You will also be prompted to add a Let’s Encrypt Certificate.
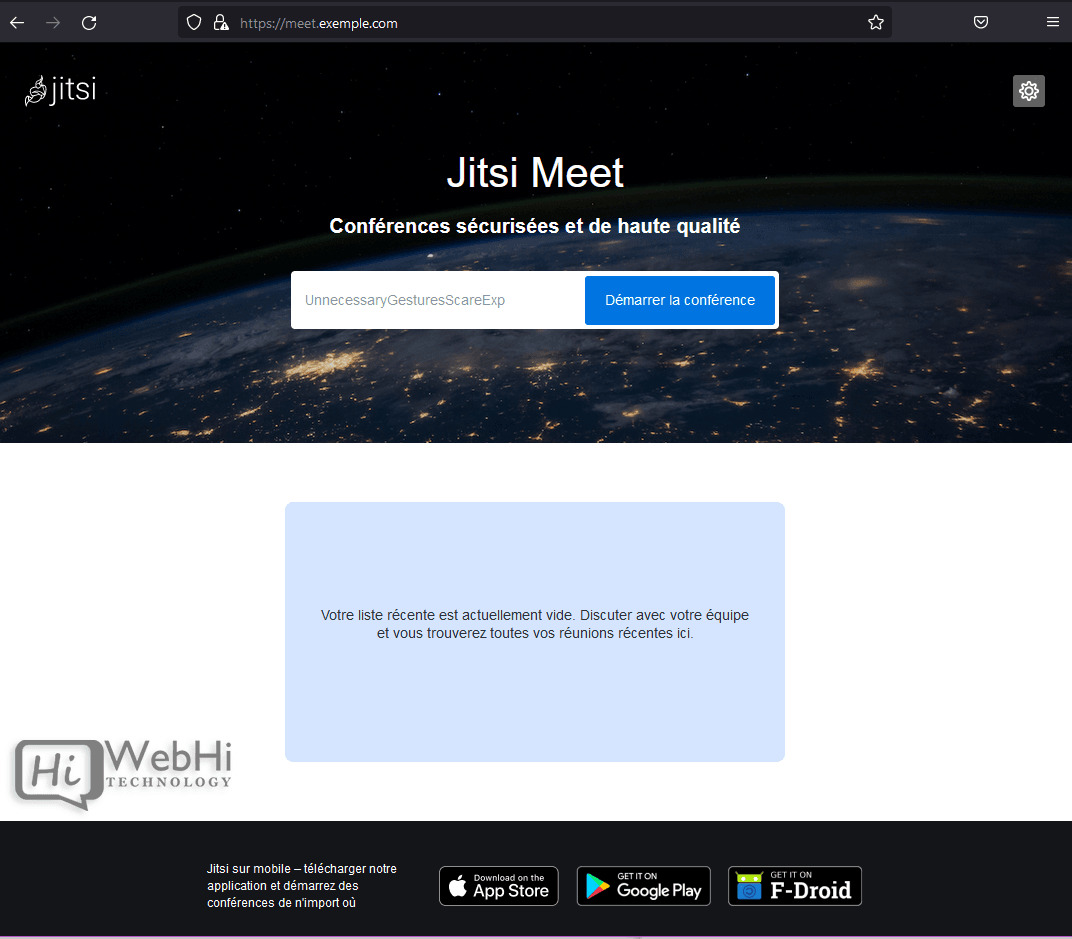
At this point, your private Jitsi Meet instance is ready for its first conference call. Open a web browser and navigate to the domain you configured, such as https://meet.example.com. You should see the Jitsi Meet welcome screen:
Step 4: Generate a Let’s Encrypt Certificate (Optional, Recommended)
While the Jitsi installation process can often handle Let’s Encrypt certificate generation, you can also manually obtain one. A TLS certificate is essential for encrypting communications and securing your Jitsi Meet instance.
Using a certificate authorized by a Certificate Authority (CA) like Let’s Encrypt is highly recommended to avoid issues with self-signed certificates. The simplest method is usually running the following script:
$ sudo /usr/share/jitsi-meet/scripts/install-letsencrypt-cert.shThis script will guide you through the process of obtaining and installing a Let’s Encrypt certificate for your domain.
Conclusion
The installation of Jitsi Meet on your Ubuntu server is now complete.
To start a conference, simply type a name for your meeting in the provided field and click "Start Meeting." You can then share the URL, set a password, adjust audio and video settings, and more. Jitsi Meet offers a versatile and secure platform for your video conferencing needs.
Alternative Installation Methods for Jitsi Meet
While the apt package manager method described above is common and straightforward, alternative approaches offer different benefits and might be more suitable for specific scenarios. Here are two alternative methods for installing Jitsi Meet:
1. Using Docker
Docker provides a containerization platform that allows you to run applications in isolated environments called containers. This approach simplifies deployment, ensures consistency across different environments, and reduces dependency conflicts.
Explanation:
Instead of installing Jitsi Meet directly on the host operating system, you can use Docker to run it within a container. This container includes all the necessary dependencies and configurations, making it easier to manage and update.
Steps:
-
Install Docker: If Docker is not already installed on your Ubuntu server, install it using the following commands:
sudo apt update sudo apt install docker.io sudo systemctl start docker sudo systemctl enable docker -
Install Docker Compose: Docker Compose is a tool for defining and running multi-container Docker applications. Install it using
pip:sudo apt install python3-pip sudo pip3 install docker-compose -
Create a
docker-compose.ymlfile: Create a new directory for your Jitsi Meet installation and create adocker-compose.ymlfile within it. This file defines the services that make up your Jitsi Meet deployment (e.g., web, jicofo, jvb, prosody). Here’s a simplified example:version: '3' services: web: image: jitsi/web:stable ports: - "80:80" - "443:443" volumes: - ./jitsi-data/web:/config environment: - JVB_HOSTNAME=jvb - CONFIG_EXTERNAL_HOSTNAME=meet.example.com depends_on: - jvb jvb: image: jitsi/jvb:stable ports: - "10000:10000/udp" environment: - DOCKER_VERNALE_PORT=10000 - PUBLIC_URL=meet.example.com volumes: - ./jitsi-data/jvb:/configNote: Replace
meet.example.comwith your actual domain. -
Run Docker Compose: Navigate to the directory containing your
docker-compose.ymlfile and run the following command to start the Jitsi Meet containers:docker-compose up -dThe
-dflag runs the containers in detached mode (in the background). -
Configure Nginx (if necessary): If you want to use Nginx as a reverse proxy in front of the Docker containers (recommended for production environments), configure Nginx to forward requests to the Docker containers. This typically involves setting up a proxy pass to the
webcontainer.Example Nginx configuration:
server {
    listen 80;
    server_name meet.example.com;
    return 301 https://$host$request_uri;
}

server {
    listen 443 ssl;
    server_name meet.example.com;

    ssl_certificate /etc/letsencrypt/live/meet.example.com/fullchain.pem;
    ssl_certificate_key /etc/letsencrypt/live/meet.example.com/privkey.pem;

    location / {
        proxy_pass http://localhost:8080; # Assuming the web container exposes port 8080
        proxy_http_version 1.1;
        proxy_set_header Upgrade $http_upgrade;
        proxy_set_header Connection "upgrade";
        proxy_set_header Host $host;
        proxy_set_header X-Real-IP $remote_addr;
        proxy_set_header X-Forwarded-For $proxy_add_x_forwarded_for;
        proxy_set_header X-Forwarded-Proto $scheme;
    }
}
Note: Adjust the port
8080if your web container exposes a different port. You also need to ensure you have a Let’s Encrypt certificate for your domain and that the paths in thessl_certificateandssl_certificate_keydirectives are correct.
2. Using Ansible
Ansible is an open-source automation tool that can be used to provision and configure infrastructure and applications. It uses a declarative language to define the desired state of a system, and Ansible ensures that the system reaches that state.
Explanation:
Instead of manually executing commands on the server, you can use Ansible to automate the entire Jitsi Meet installation process. This is particularly useful for deploying Jitsi Meet across multiple servers or for ensuring consistent configurations.
Steps:
-
Install Ansible: If Ansible is not already installed on your control machine (the machine from which you’ll run the Ansible playbook), install it using
pip:sudo apt update sudo apt install python3-pip sudo pip3 install ansible -
Create an Ansible Playbook: Create an Ansible playbook (e.g.,
jitsi_install.yml) that defines the tasks required to install Jitsi Meet. This playbook will include tasks for updating the system, installing dependencies, adding the Jitsi repository, installing Jitsi Meet, configuring the hostname, and obtaining a Let’s Encrypt certificate.Example Ansible Playbook Snippet:
---
- hosts: all
  become: true
  tasks:
    - name: Update apt cache
      apt:
        update_cache: yes

    - name: Install required packages
      apt:
        name:
          - nginx
          - apt-transport-https
        state: present

    - name: Add Jitsi repository key
      apt_key:
        url: https://download.jitsi.org/jitsi-key.gpg.key
        state: present

    - name: Add Jitsi repository
      apt_repository:
        repo: 'deb [signed-by=/usr/share/keyrings/jitsi-keyring.gpg] https://download.jitsi.org stable/'
        state: present
        filename: jitsi

    - name: Install Jitsi Meet
      apt:
        name: jitsi-meet
        state: present

    - name: Configure Jitsi hostname
      # This is a placeholder; you'll need to use a more robust method
      # to configure the hostname based on your specific requirements.
      debug:
        msg: "Remember to configure the Jitsi hostname (e.g., meet.example.com)"

    - name: Obtain Let's Encrypt certificate
      # This is a placeholder; you'll need to use a more robust method
      # to obtain and install the Let's Encrypt certificate.  Consider
      # using the `acme_certificate` module or a custom script.
      debug:
        msg: "Remember to obtain and install a Let's Encrypt certificate."
Important Notes:
- Hostname Configuration: The playbook snippet includes a placeholder for configuring the Jitsi hostname. You’ll need to replace this with a more robust method that sets the appropriate configuration files. This often involves modifying files like
/etc/jitsi/meet/meet.example.com-config.js(replacemeet.example.comwith your actual domain). - Let’s Encrypt Certificate: Similarly, the playbook includes a placeholder for obtaining and installing a Let’s Encrypt certificate. You can use the
acme_certificatemodule (requires thecommunity.cryptocollection) or a custom script that usescertbotto automate this process. - Inventory File: You will need to create an inventory file (e.g.,
hosts) that lists the IP addresses or hostnames of the servers where you want to install Jitsi Meet.
- Hostname Configuration: The playbook snippet includes a placeholder for configuring the Jitsi hostname. You’ll need to replace this with a more robust method that sets the appropriate configuration files. This often involves modifying files like
-
Run the Ansible Playbook: Execute the Ansible playbook using the following command:
ansible-playbook -i hosts jitsi_install.ymlReplace
hostswith the name of your inventory file andjitsi_install.ymlwith the name of your playbook.
These alternative methods, Docker and Ansible, offer powerful ways to deploy and manage Jitsi Meet, each with its own set of advantages. Docker provides containerization for consistent environments, while Ansible offers automation for large-scale deployments. Choosing the right method depends on your specific needs and infrastructure. Installing Jitsi Meet can be achieved in multiple ways, and these are just two examples.