
Installing SSL Certificate in Exchange Server with PowerShell
This tutorial will guide you through the process of creating a Certificate Signing Request (CSR) for your Exchange server using PowerShell and subsequently installing the SSL certificate. This method applies to Exchange versions 2013, 2016, and 2019. Securing your Exchange server with a valid SSL certificate is crucial for protecting sensitive data transmitted between clients and the server. The lack of an SSL certificate can lead to man-in-the-middle attacks and other security vulnerabilities.
You can find instructions for the GUI version of this process in the article: Installing and Configuring an SSL Certificate in Microsoft Exchange Server. However, this article focuses on the PowerShell approach, offering a more streamlined and automated method for administrators familiar with command-line interfaces.
Step 1: Generate a CSR (Certificate Signing Request)
The first step is to generate a CSR. This request contains information about your organization and domain, which is required by the Certificate Authority (CA) to issue the SSL certificate.
Execute the following PowerShell command to generate the certificate request:
[PS] C:> $txtrequest = New-ExchangeCertificate –Server "EX01-2022" –GenerateRequest –FriendlyName "Exchange Certificate" –PrivateKeyExportable $true –SubjectName "c=MA, s=RABAT, l=Rabat, o=EXEMPLE, ou=IT, cn=mail.exemple.com" –DomainName mail.exemple.com,autodiscover.exemple.comExplanation of Parameters:
–Server: Specifies the name of the Exchange server. Replace "EX01-2022" with your actual server name.–GenerateRequest: Indicates that a certificate request should be generated.–FriendlyName: Assigns a user-friendly name to the certificate. This helps in identifying the certificate later.–PrivateKeyExportable: Allows the private key to be exported. This is important for backing up the certificate.–SubjectName: Specifies the distinguished name of the certificate. This includes the country (c), state (s), locality (l), organization (o), organizational unit (ou), and common name (cn). Ensure this matches the domain name you intend to secure.–DomainName: Lists the domain names and subdomains that the certificate should cover. Include all relevant domains, such asmail.exemple.comandautodiscover.exemple.com.
Next, export the certificate request to a shared folder using the following command:
[PS] C:> [System.IO.File]::WriteAllBytes('\ex01-2022CertsExchangeCrt.req', [System.Text.Encoding]::Unicode.GetBytes($txtrequest))This command writes the CSR to a file named ExchangeCrt.req in the specified shared folder. Make sure the Exchange server has write access to this shared folder.
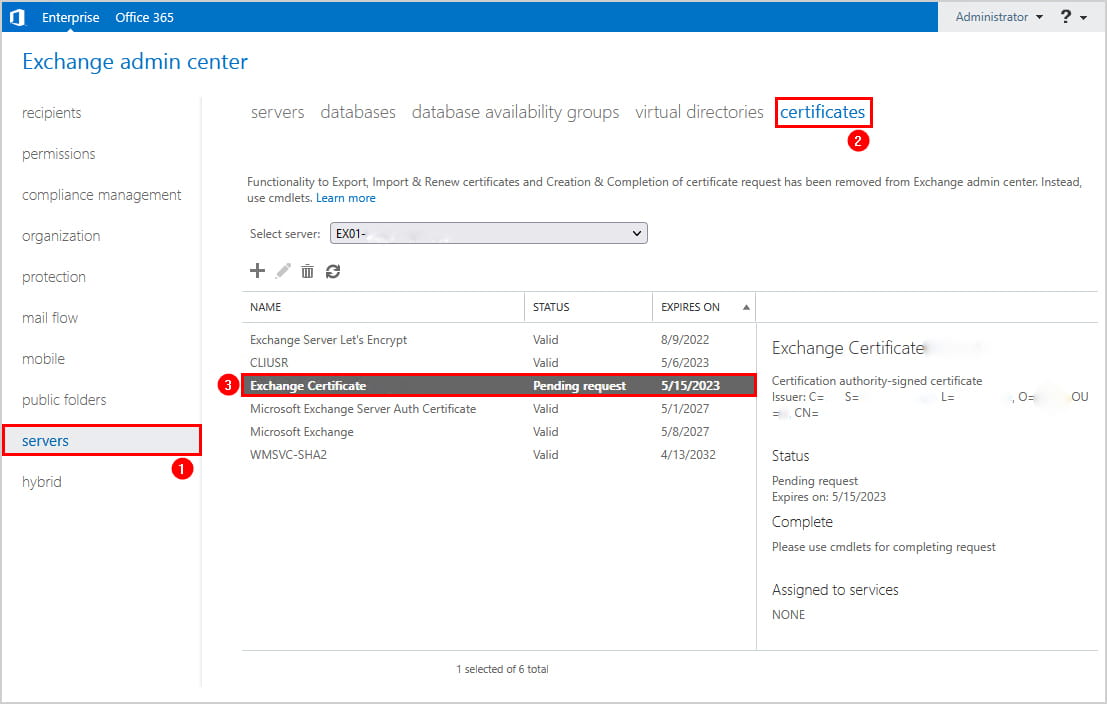
Open the Exchange Admin Center and log in. Navigate to the servers > certificates menu. Verify that the Exchange certificate is listed with a "pending request" status.
Step 2: Submit the Certificate
Now, submit the generated CSR to your chosen SSL certificate provider.
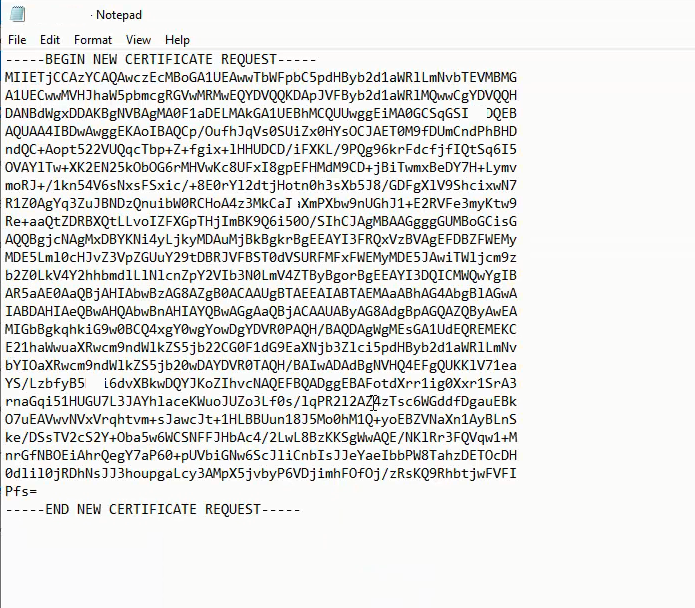
Open the ExchangeCrt.req file using a text editor (like Notepad). Copy the entire content, including the -----BEGIN NEW CERTIFICATE REQUEST----- and -----END NEW CERTIFICATE REQUEST----- tags. Paste this content into the CSR field on your SSL provider’s website. Some providers may allow you to upload the .req file directly.
Once the SSL provider validates your request, they will issue the SSL certificate.
Step 3: Import the Certificate
After receiving the certificate from the Certificate Authority (CA), download the certificate file (usually in .crt or .cer format) and save it to the shared folder on the Exchange server.
Let’s assume the certificate file is named exchagecrt.crt.
Import the certificate using the following PowerShell command:
[PS] C:> Import-ExchangeCertificate -FileData ([System.IO.File]::ReadAllBytes('\ex01-2022Certsexchagecrt.crt')) -PrivateKeyExportable:$true -Password (ConvertTo-SecureString -String 'P@ssw0rd' -AsPlainText -Force)Explanation:
–FileData: Specifies the path to the certificate file.–PrivateKeyExportable: Allows the private key to be exported (set to$true).–Password: If the certificate requires a password, provide it here. This example uses a placeholder password ‘P@ssw0rd’. Replace it with the actual password if applicable.
After importing, the Exchange certificate status should change to "Valid" in the Exchange Admin Center.
Assign Exchange Services to the Certificate
To enable the certificate for use with Exchange services, you need to assign the services to it. First, copy the certificate thumbprint from the certificate details in the Exchange Admin Center. Double-click the certificate to view its properties.
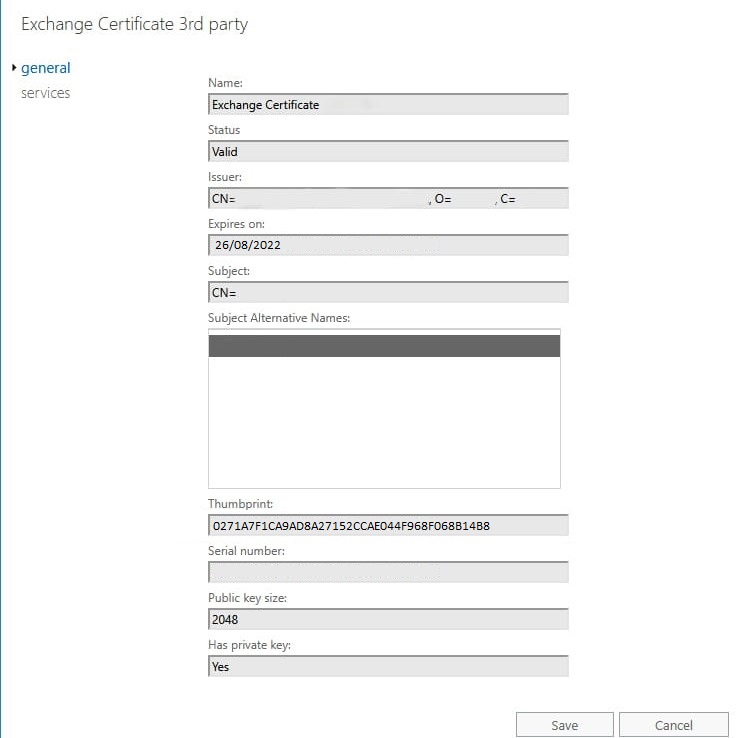
Run the following command to assign services to the certificate. Replace 0271A7F1CA9AD8A27152CCAE044F968F068B14B8 with the actual thumbprint value you copied.
[PS] C:> Enable-ExchangeCertificate -Server "EX01-2022" -Thumbprint 0271A7F1CA9AD8A27152CCAE044F968F068B14B8 -Services SMTP,IMAP,IIS -ForceExplanation:
–Server: Specifies the Exchange server name.–Thumbprint: Specifies the thumbprint of the certificate.–Services: Lists the Exchange services to be assigned to the certificate. Common services include SMTP (for email sending), IMAP (for email retrieval), and IIS (for web-based access like Outlook Web App).–Force: Suppresses confirmation prompts.
Restart IIS Service
Finally, restart the Internet Information Services (IIS) on the Exchange server to apply the changes. This can be done using the following command in PowerShell:
Restart-Service W3SVCThe SSL certificate should now be successfully installed and configured on your Exchange server. Installing SSL Certificate in Exchange is now complete.
Alternative Solutions for Installing SSL Certificate in Exchange
While the above method is effective, here are two alternative approaches to installing SSL Certificate in Exchange:
1. Using Let’s Encrypt with Certify The Web:
Let’s Encrypt is a free, automated, and open Certificate Authority. While it doesn’t directly integrate with Exchange’s certificate management, tools like "Certify The Web" can automate the process of obtaining and installing Let’s Encrypt certificates.
- Explanation: Certify The Web is a Windows application that simplifies the process of requesting, installing, and renewing Let’s Encrypt certificates on IIS. It automatically handles the ACME challenge (domain verification) and can update the certificate bindings in IIS and, crucially, also update the Exchange configuration to use the new certificate. This method is suitable for smaller organizations or those looking for a cost-effective solution.
- How it works: Certify the Web uses the ACME protocol to communicate with Let’s Encrypt. It typically uses a web server challenge (placing a file on your webserver for Let’s Encrypt to verify) but can also use DNS challenges (adding a TXT record to your DNS). Once the certificate is issued, Certify The Web can be configured to automatically update the certificate bindings in IIS and, more importantly, run a PowerShell script to enable the new certificate for Exchange services.
Example (Conceptual PowerShell script within Certify The Web after certificate renewal):
# This script would run automatically after Certify The Web renews the certificate
# Replace with the actual server name and adjust services as needed

$Thumbprint = (Get-ChildItem -Path Cert:LocalMachineMy | Where-Object {$_.FriendlyName -like "*mail.exemple.com*"}).Thumbprint

if ($Thumbprint) {
    Enable-ExchangeCertificate -Server "EX01-2022" -Thumbprint $Thumbprint -Services SMTP,IMAP,IIS -Force
    Restart-Service W3SVC
    Write-Host "Successfully updated Exchange certificate."
} else {
    Write-Host "Certificate not found. Check the FriendlyName."
}
2. Using a Centralized Certificate Management System (e.g., Venafi, Keyfactor):
Larger organizations often use centralized certificate management systems to manage certificates across their entire infrastructure, including Exchange servers.
- Explanation: These systems provide a central repository for storing and managing certificates. They can automate the certificate lifecycle, including requesting, installing, renewing, and revoking certificates. They often integrate with various infrastructure components, including Exchange, to ensure consistent certificate management. These platforms generally have agents that run on the Exchange server and are responsible for deploying and configuring the certificates.
- How it works: The certificate management system integrates with your chosen Certificate Authorities (internal or external) and automates the process of requesting and deploying certificates. The agent on the Exchange server receives the certificate and private key from the central system and automatically configures Exchange to use the new certificate, eliminating the need for manual intervention.
While these solutions often come with a cost, they provide significant benefits in terms of automation, security, and compliance for organizations with complex IT environments. Choosing the right approach depends on your organization’s size, budget, and technical expertise. Installing SSL Certificate in Exchange doesn’t need to be overly complicated.