Using Multiple PHP Versions with Apache on CentOS / RHEL
To effectively manage numerous domains within a single server instance, the Apache web server utilizes virtual hosts. Similarly, PHP-FPM (FastCGI Process Manager) allows for the management of multiple PHP versions on a single instance through the use of a daemon. By combining Apache and PHP-FPM, it becomes possible to host multiple PHP web applications, each running on a different PHP version, simultaneously on the same server. This is particularly beneficial because a standard LAMP (Linux, Apache, MySQL, PHP) stack configuration typically supports only one PHP version at a time, while different applications may require different versions for compatibility or specific feature sets. Hosting each application on a separate server instance can be costly, making the Apache and PHP-FPM combination a more cost-effective solution.
Furthermore, for websites with high traffic volumes, PHP-FPM provides advanced configuration options for logging errors (stderr) and standard output (stdout), implementing emergency restarts, and dynamically spawning processes based on demand. In fact, using Apache with PHP-FPM is considered one of the best stacks for hosting PHP applications, especially when performance is a critical factor.
In this tutorial, we will demonstrate how to set up two PHP websites on a single CentOS 7 server instance. Each website will have its own domain name and will utilize a different PHP version. The first website, web1.yourdomain.com, will run on PHP 8.0, while the second website, web2.yourdomain.com, will run on PHP 7.4. This configuration will allow us to explore the benefits of Using Multiple PHP Versions with Apache on CentOS / RHEL.
Requirements
- A CentOS 7 or RHEL server instance.
- Root or sudo privileges.
- Basic knowledge of the command line.
- A domain name (or the ability to modify your hosts file for testing).
Step 1 : Installing PHP Versions and Apache
First, we will install the EPEL (Extra Packages for Enterprise Linux) repository and then install Apache with the following commands:
$ sudo yum install epel-release -y
$ sudo yum install httpd
After setting up Apache, we’ll install the Remi repository, which provides more recent versions of PHP, and then install PHP 8.0 and 7.4.
$ sudo yum install http://rpms.remirepo.net/enterprise/remi-release-7.rpm
$ sudo yum install yum-utils
$ sudo yum install php80 php74
$ sudo yum install php80-php-fpm php74-php-fpm
By default, both versions of PHP are configured to listen on port 9000. However, to run both versions simultaneously, we need to assign them different ports.
To do this, open the configuration file for PHP 8.0-FPM (/etc/opt/remi/php80/php-fpm.d/www.conf) using your preferred text editor, and change every instance of 9000 to 9080. Repeat the same process for PHP 7.4-FPM (/etc/opt/remi/php74/php-fpm.d/www.conf), replacing 9000 with 9074. Save and close the files.
Alternatively, you can use the following sed commands to perform the replacements:
$ sudo sed -i 's/:9000/:9080/' /etc/opt/remi/php80/php-fpm.d/www.conf
$ sudo sed -i 's/:9000/:9074/' /etc/opt/remi/php74/php-fpm.d/www.conf
Now that each PHP service has a unique port, we need to add these ports to the SELinux (Security-Enhanced Linux) configuration.
SELinux is enabled by default in CentOS 7 and provides an extra layer of security. To allow our applications to function correctly, we need to add the new ports (9080 and 9074) to the SELinux database and associate them with the HTTP services. Use the semanage command to accomplish this:
$ sudo semanage port -a -t http_port_t -p tcp 9080
$ sudo semanage port -a -t http_port_t -p tcp 9074
Now we can start the PHP-FPM services on their respective ports.
Start the php80-php-fpm service and enable it to start automatically at boot:
$ sudo systemctl start php80-php-fpm
$ sudo systemctl enable php80-php-fpm
Check the status of the php80-php-fpm service to ensure it is running correctly:
$ sudo systemctl status php80-php-fpm[root@centos7 ~]# sudo systemctl status php80-php-fpm
● php80-php-fpm.service - The PHP FastCGI Process Manager
Loaded: loaded (/usr/lib/systemd/system/php80-php-fpm.service; enabled; vendor preset: disabled)
Active: active (running) since Fri 2022-08-12 07:16:12 EDT; 14min ago
Main PID: 65544 (php-fpm)
Status: "Processes active: 0, idle: 5, Requests: 0, slow: 0, Traffic: 0req/sec"
CGroup: /system.slice/php80-php-fpm.service
└─65544 php-fpm: master process (/etc/opt/remi/php80/php-fpm.conf)
└─65545 php-fpm: pool www
└─65546 php-fpm: pool www
└─65547 php-fpm: pool www
└─65548 php-fpm: pool www
└─65549 php-fpm: pool www
Aug 12 07:16:12 centos7.linuxvmimages.local systemd[1]: Starting The PHP FastCGI Process Manager...
Aug 12 07:16:12 centos7.linuxvmimages.local systemd[1]: Started The PHP FastCGI Process Manager.Repeat the process for the php74-php-fpm service:
$ sudo systemctl start php74-php-fpm
$ sudo systemctl enable php74-php-fpm
Check the status of the php74-php-fpm service:
$ sudo systemctl status php74-php-fpm[root@centos7 ~]# sudo systemctl status php74-php-fpm
● php74-php-fpm.service - The PHP FastCGI Process Manager
Loaded: loaded (/usr/lib/systemd/system/php74-php-fpm.service; enabled; vendor preset: disabled)
Active: active (running) since Fri 2022-08-12 07:16:20 EDT; 16min ago
Main PID: 65556 (php-fpm)
Status: "Processes active: 0, idle: 5, Requests: 0, slow: 0, Traffic: 0req/sec"
CGroup: /system.slice/php74-php-fpm.service
└─65556 php-fpm: master process (/etc/opt/remi/php74/php-fpm.conf)
└─65557 php-fpm: pool www
└─65558 php-fpm: pool www
└─65559 php-fpm: pool www
└─65560 php-fpm: pool www
└─65561 php-fpm: pool www
Aug 12 07:16:19 centos7.linuxvmimages.local systemd[1]: Starting The PHP FastCGI Process Manager...
Aug 12 07:16:20 centos7.linuxvmimages.local systemd[1]: Started The PHP FastCGI Process Manager.Step 2: Making Directories for Both Websites
In this section, we will create the document root directories and index pages for each of our two websites.
First, create the directories for web1.yourdomain.com and web2.yourdomain.com:
$ sudo mkdir /var/www/web1.yourdomain.com
$ sudo mkdir /var/www/web2.yourdomain.com
The Apache user and group (typically apache) should own the /var/www/ directory and all its contents. This ensures that Apache has the necessary permissions to serve the website files. Use the following commands to set the correct ownership and permissions:
$ sudo chown -R apache:apache /var/www/web1.yourdomain.com
$ sudo chown -R apache:apache /var/www/web2.yourdomain.com
$ sudo chmod -R 755 /var/www/web1.yourdomain.com
$ sudo chmod -R 755 /var/www/web2.yourdomain.com
Now, create an info.php file in the root directory of each website. This file will display the PHP version information for each website. Start with web1.yourdomain.com:
$ sudo nano /var/www/web1.yourdomain.com/info.phpAdd the following line to the file:
<?php phpinfo(); ?>Save the file and then copy it to the second website’s root directory:
$ sudo cp /var/www/web1.yourdomain.com/info.php /var/www/web2.yourdomain.com/info.phpStep 3 : Apache Configuration for Both Websites
In this step, we will create the virtual host configuration files for our two websites. These files will instruct Apache on how to serve the content for each domain and which PHP version to use. This is critical to Using Multiple PHP Versions with Apache on CentOS / RHEL.
Create a new virtual host configuration file for web1.yourdomain.com in the /etc/httpd/conf.d/ directory. This file will configure Apache to use PHP 8.0 for this website:
$ sudo nano /etc/httpd/conf.d/web1.yourdomain.com.confAdd the following code to the file:
<VirtualHost *:80>
     ServerAdmin [email protected]
     ServerName web1.yourdomain.com
     DocumentRoot /var/www/web1.yourdomain.com
     DirectoryIndex info.php
     SetHandler "proxy:fcgi://127.0.0.1:9080"
     ScriptAlias /cgi-bin/ "/var/www/cgi-bin/"
     AddHandler php80-fcgi .php
     Action php80-fcgi /cgi-bin/php80.fcgi
     ErrorLog /var/log/httpd/web1.yourdomain.com_error.log
     CustomLog /var/log/httpd/web1.yourdomain.com_access.log combined
</VirtualHost>
Now, create the virtual host configuration file for web2.yourdomain.com:
$ sudo nano /etc/httpd/conf.d/web2.yourdomain.com.confAdd the following code to the file:
<VirtualHost *:80>
     ServerAdmin [email protected]
     ServerName web2.yourdomain.com
     DocumentRoot /var/www/web2.yourdomain.com
     DirectoryIndex info.php
     SetHandler "proxy:fcgi://127.0.0.1:9074"
     ScriptAlias /cgi-bin/ "/var/www/cgi-bin/"
     AddHandler php74-fcgi .php
     Action php74-fcgi /cgi-bin/php74.fcgi
     ErrorLog /var/log/httpd/web2.yourdomain.com_error.log
     CustomLog /var/log/httpd/web2.yourdomain.com_access.log combined
</VirtualHost>
Save and close the file. After that, check the Apache configuration file for any syntax errors:
$ sudo apachectl configtest[root@centos7 ~]# sudo apachectl configtest
Syntax OKFinally, restart the Apache service to apply the changes:
$ sudo systemctl restart httpdStep 4 : Testing Our Websites
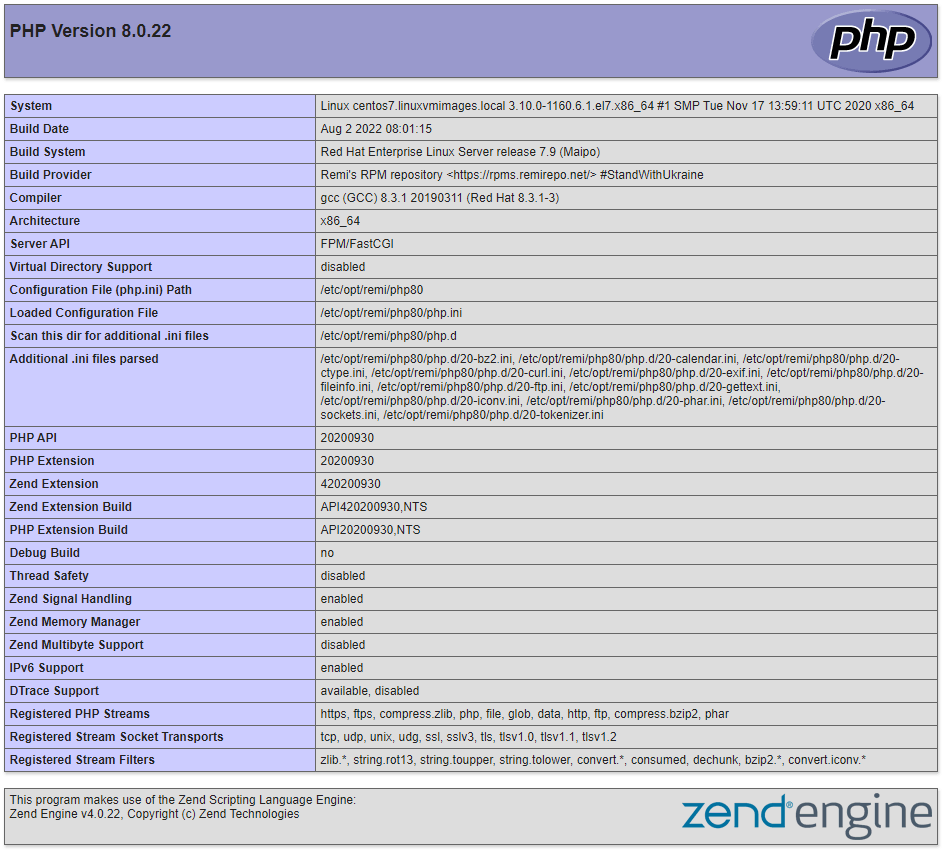
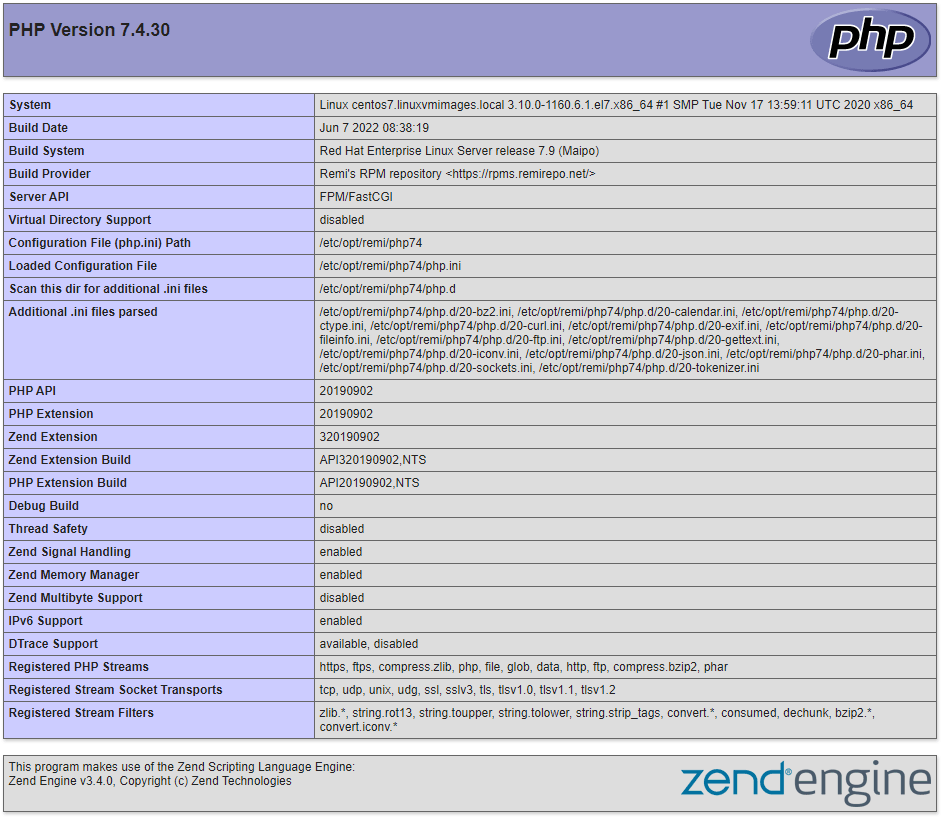
Open your web browser and visit http://web1.yourdomain.com and http://web2.yourdomain.com. You should see two pages displaying PHP information, each indicating a different PHP version.
http://web1.yourdomain.com/

http://web2.yourdomain.com/

After testing your websites, remove the info.php files. They can pose a security risk by exposing sensitive information about your server to unauthorized users.
$ sudo rm -rf /var/www/web1.yourdomain.com/info.php
$ sudo rm -rf /var/www/web2.yourdomain.com/info.php
You have now successfully configured two websites to run on different PHP versions on a single CentOS 7 server, demonstrating the power of Using Multiple PHP Versions with Apache on CentOS / RHEL.
Conclusion
By combining virtual hosts and PHP-FPM, you can efficiently host multiple websites, each running on a different PHP version, on a single server. The only real limitation is the processing power of your server instance. This method of Using Multiple PHP Versions with Apache on CentOS / RHEL is efficient and cost-effective.
Alternative Solutions
While the PHP-FPM approach is highly effective, here are two alternative methods for managing multiple PHP versions with Apache:
1. Using Docker Containers:
Docker provides a containerization platform that allows you to package applications with all their dependencies, including specific PHP versions, into isolated containers. Each website can run in its own Docker container with the required PHP version, and Apache can be configured to proxy requests to these containers.
- Explanation: Docker containers offer excellent isolation and portability. Each container has its own filesystem, processes, and network interfaces, preventing conflicts between different PHP versions.
- Implementation:
- Create Dockerfiles for each website, specifying the desired PHP version and dependencies.
- Build Docker images from the Dockerfiles.
- Run Docker containers for each website.
- Configure Apache to proxy requests to the appropriate container based on the domain name.
-
Code Example (Docker Compose file):
version: "3.8" services: web1: image: php:8.0-apache ports: - "8081:80" volumes: - ./web1:/var/www/html environment: VIRTUAL_HOST: web1.yourdomain.com web2: image: php:7.4-apache ports: - "8082:80" volumes: - ./web2:/var/www/html environment: VIRTUAL_HOST: web2.yourdomain.com reverse_proxy: image: nginx:latest ports: - "80:80" volumes: - ./nginx.conf:/etc/nginx/conf.d/default.conf depends_on: - web1 - web2- This docker-compose sets up two containers, web1 and web2. Each uses a different php version. A reverse proxy using nginx sends traffic to the proper container.
2. Using mod_php with Multiple Apache Instances:
While less common and potentially resource-intensive, another approach involves running multiple instances of Apache, each linked to a different `mod_php` version.

*   **Explanation:**  Each Apache instance serves requests for a specific domain and uses a specific `mod_php`. This avoids conflicts but consumes more resources due to multiple Apache processes.  This is also more complex to configure and maintain.
*   **Implementation:**
    *   Install multiple Apache instances (potentially using different ports).
    *   Compile `mod_php` for each PHP version.
    *   Configure each Apache instance to load the corresponding `mod_php`.
    *   Use virtual hosts to direct traffic to the correct Apache instance based on the domain name.
*   **Caveats:** This method is complex and can be resource-intensive.  It's generally less efficient than using PHP-FPM or Docker.  There's no easily copy-pasteable code example here because the steps are significantly more involved and dependent on the specific system setup.  It involves compiling PHP with Apache modules, creating separate Apache configuration files, and ensuring port conflicts are avoided.  This approach is generally discouraged unless there are very specific reasons to use `mod_php` instead of PHP-FPM.
These alternative solutions provide different approaches to managing multiple PHP versions, each with its own trade-offs in terms of complexity, resource consumption, and isolation.